2019年4月7日星期日

Miniature lightweight and high performance touch for unity3d


Overview

In some large-scale games, especially in the case of multiple players on the same screen, if you use the Collider component that unity3d comes with to trigger the click response of the 3D model, it is actually consumed. In order to reduce consumption and improve performance, the tiny touch plug-in was specially developed to improve the performance of the project. Tiny touch is easy to use, superior in performance and flexible to use.

This article describes the basic usage of high-performance "tiny touch" and its applications.
Quick Start
First, open the demo scene Demo/Demo1
You can see the following picture:
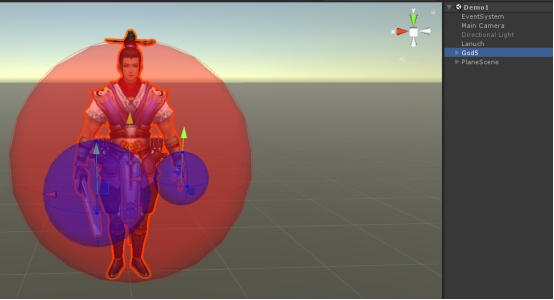


Here you can see a 3D character model and three circles on the model. These circles are the effective areas for clicks.

First let's get ready for work:
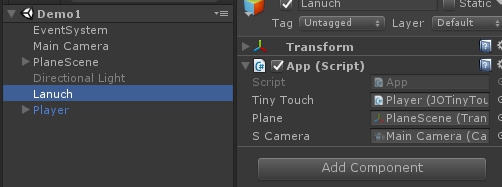
Make sure there are three objects in the Hierarchy, the EventSystem, the camera that hangs the Physics Raycaster component, and the ground with the BoxCollider component.

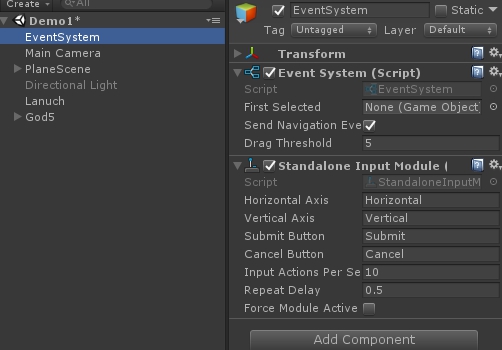
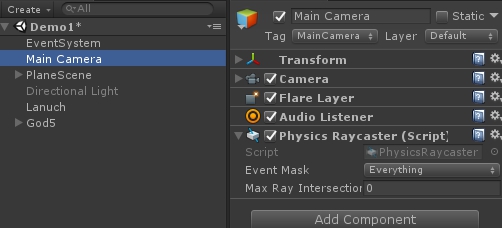
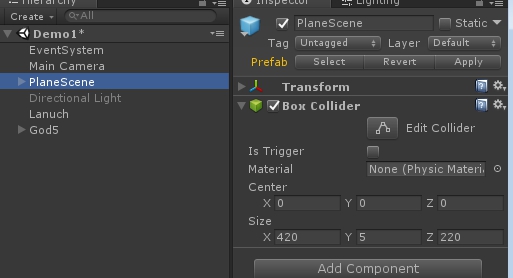

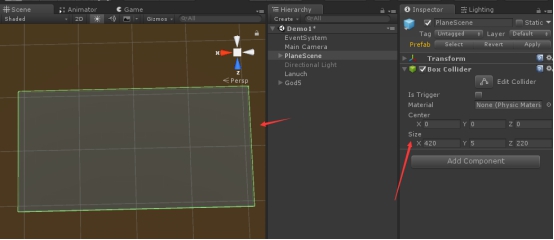
The BoxCollider component in the ground must cover the entire ground!

The TinyTouch component 1.0. A rough description of the scope:
Add the component TinyTouch to the model player.
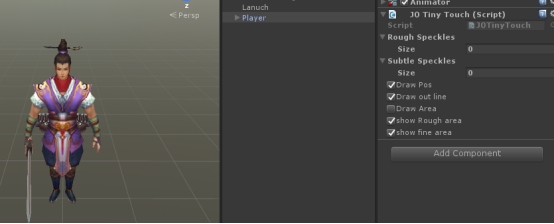


No task changes have taken place.
We set the size of Rough Speckles to 1 and the following properties appear:


Then drag the player object into Blind, and the y value of Offset is set to 1.1
Radius is set to 1. The following effects occur:
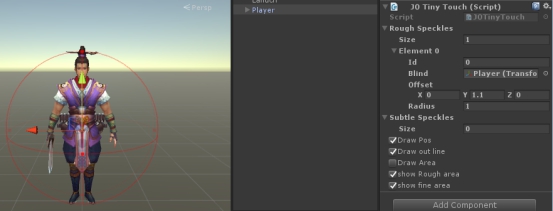


Check the Draw Area and remove the Draw Pos and Draw out line options. The effect is as follows:
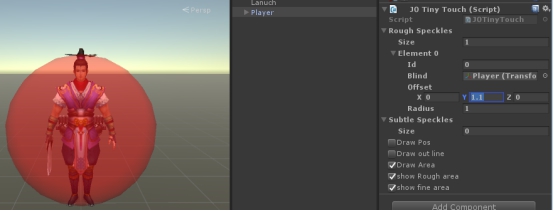

Such a rough click response area is complete.

The TinyTouch component 2.0 Detailed description of the scope:

Then we set the size of the Subtle Speckles to 2
Set the id of element 0 to 1, and the id of element 1 to 2
Drag the bone of the left hand to the Blind of element 0, and drag the bone of the right hand sword to the Blind of element 1
Set the offset z of element 1 to -0.45
Set Radius of element 0 to 0.24 and Radius of element 1 to 0.33


This meticulous click area is also ready.

The TinyTouch component 3.0 Inspector property description:
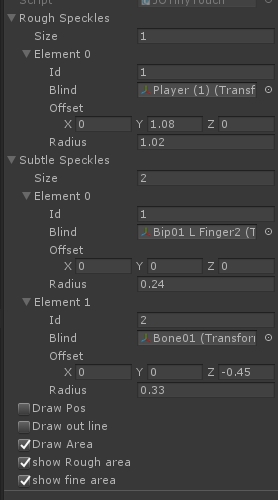

Rough Speckles: Set the sphere of the rough range. One model is usually one or none.
Subtle SpeckLes: Set a detailed range of spheres, which can have one or more in a model.

The elements inside are sphere properties.
Id : That is, the fixed sphere ID is generally used for returning after clicking the response.
BlidThe object bound by the sphere can be either the model itself or an object in a part of the model.
OffsetThe offset from the bound object.
RadiusThe radius of the sphere.


Draw PosWhether to display the center point of the sphere. When the center point is displayed, you can drag it to achieve the effect of the offset.
Draw Out Line: Whether to display the border of the sphere.
Draw Area: Whether to display the inside of the straight-filled sphere.
Show Rough area: Whether to display a rough sphere.
Show fine areaWhether to display a fine sphere.
After the above properties are set, the prefab is saved and the corresponding properties are serialized and saved.

Demo operation instructions :
Make a click response class:
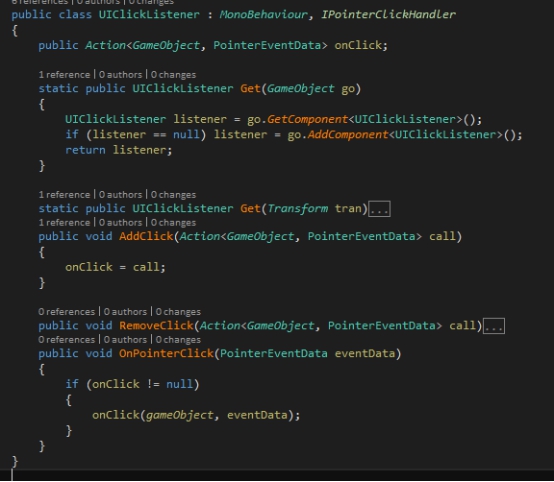

Startup script:
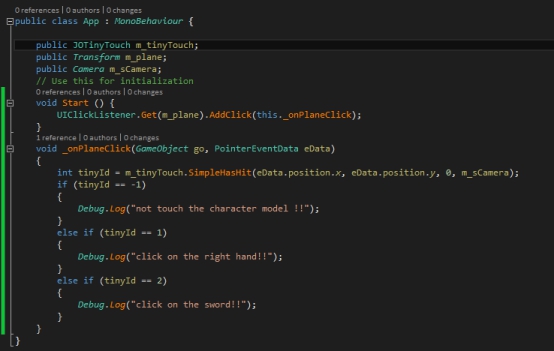


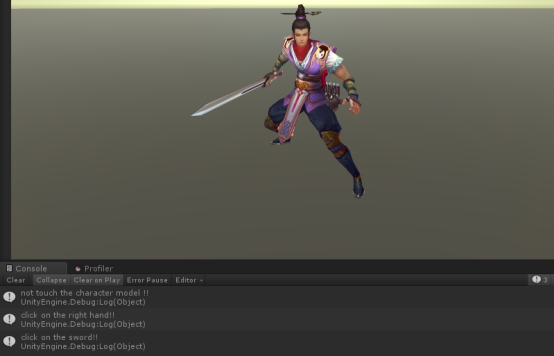
Run the program, when I click on the blank place of the scene, click on the left hand of the model, click on the sword of the model, the output is as follows:


API description:
Int tinyId=m_tinyTouch.SimpleHasHit(x,y,z, camera);
//If not clicked, the returned tinyId is -1.
//Otherwise, the tinyId is the id of the fine sphere.
//Parameter camera: for the camera with the Physics Raycaster component attached
//Where xyz is the screen coordinates of the click

Future Content
1. Further optimize performance
2. Provide more convenient calls


Welcome to contact us

Unity Asset Store URL:
https://assetstore.unity.com/packages/slug/142548

2019年3月28日星期四

帧循环系统

       在一般的程序工程中,或多或少都需要在帧循环中进行一定的逻辑处理。
unity中其实也有这个功能,就是MonoBehaviour脚本下的Update回调。
而定时回调,也有相关接口,是调用Invoke方法, 但也是需要在MonoBehaviour脚本下才可执行。

        为了打破一些限制,设计出帧循环系统。

        通过简单的事件注册,即可以实现帧循环的回调处理,不需要继承MonoBehaviour,可以进行灵活的注册和注销操作。
同时,可以实现延时回调,也可以实现循环的指定时间间隔回调,这些方法都可以灵活取消,同时这些回调中可以带可变参数,使功能更强大。
如果你使用unity+xlua的话,这功能系统还可以支持lua的调用。

本功能插件已上架unity商店。
地址:http://xxx

欢迎查阅。

The log system for unity3d


In a project, program information output is essential. However, the ordinary output is not easy to control, and a large number of outputs will not only affect the performance, but also make the output chaotic, it is difficult to find effective information.
Therefore, the LogDog plug-in has been developed to effectively filter the output type and category, help locate the location of the information, and effectively handle the frame-down rate caused by a large number of simultaneous outputs.

This article describes the basic usage of the high-performance "Log Dog" and its applications.

Quick Start

First, let's look at the content format of an output.


The output is divided into three types, INFO, WARN, ERROR.
The green arrow is the output title.
The red arrow is the output serial number.
The blue arrow is the output content.
The orange arrow is the output module logo.
The second line is the file where the output is located and the line it is in.

Output with parameters:

LogDog supports output with multiple parameters, which can be a string, can be an object, and can be a combination of multiple types.


Filter output function:

LogDog can filter the output of the specified model flags. This way, you can focus on only the key log information without deleting or commenting the code.


In Start, the two module flags BAG and CHAT are filtered.
Then call the event method


The output of the log is as follows


Obviously, the output of lines 69 and 70 is not output and is filtered.

Output without file positioning:

Sometimes, most of the logic code for program engineering is developed in other lightweight languages as needed. Compare Lua, js, etc. . .
At this time, the output without file positioning can be called, and the specific log positioning is written in the corresponding language.


Demo operation instructions :
LogDog can also do custom output processing, like writing a file, sending the specified output data to the background or server, or there is no output panel on the phone, you need to redefine the output to the display screen. . .

In this case, do a demo to redefine the output to the display screen.


Mount the startup script and add the Content of the ScrollView and ScrollView in the UI. TextPrefab is just a normal prefab. In the AJ_LogDog/Prefab directory.


Also add a Button, just to set whether to display the ScrollView.


Set the callback processing method for the log.


The effect of opening the log panel is as follows:


API description:
JOLog.Ins.SetTitle("LOG_TITLE");
//Set the output title.
JOLog.Ins.SetEnable(true);
//Set the output switch. If it is false, all logs will not be processed.
JOLog.Ins.SetLogLevel(1);
// Error:3>Warn:2>Info:1
//Set the output level, and the output is greater than or equal to Info.
//If the parameter is 2, only the output levels of Warn and Error are output.
JOLog.Ins.SetRunInTick(true);
// Whether to frame processing when setting the output, it is recommended to set to true.
// In this way, the program will not cause large fluctuations in the frame rate due to multiple outputs at the same time.
// When set to true, you need to call JOLog.Ins.Tick() in the started Update method;


JOLog.Ins.AddIgnoreTag("Ignore Tag");
// Set filter flag
// All logs with some flags are not output. (except for error output)
JOLog.Ins.SetCall(this._LogCall);
void _LogCall(short logLv, string msg);
// Set the output callback, you can customize the output if needed
// In addition, due to some abnormally captured output of the program, it is also the object of our attention.
// If you need to redefine the output processing, you can add LogExceptionCatch to supplement
LogExceptionCatch.Ins.SetDebug(true);
LogExceptionCatch.Ins.SetDrawCall(this._LogCall);


Future Content
1. Further optimize performance
2. Provide more convenient calls
3. Increase specified output

Welcome to contact us

Unity Asset Store URL: https://assetstore.unity.com/packages/slug/142605


2019年3月20日星期三

High performance A* Pathfinding

AJ_Pathfinding

High-performance A* Pathfinding

Overview

Combination With the development of mobile games, we need to do more performance on mobile phones, but the performance of mobile phones is limited. Every important module should have as much performance as possible to improve the overall performance. In the pathfinding algorithm, the common a* has a large consumption performance when comparing large maps. Therefore, I have made a* a good improvement. This is already used as a simple tool class. The plugin includes a tool for blocking data generation and a Demo for pathfinding algorithm.

This article describes the basic usage of high performance "pathfinding" and its applications.


Quick Start
First, open the demo scene Demo/DemoSearch1 and run it.
You can see the following picture:


Multiple objects are randomly free to find paths. You can also click on the scene freely and let the main character object (red dot) run for pathfinding.
When the main character finds a path, it will output the time of the path finding in the output panel.
As can be seen from the figure, the frame rate is still high in the case of continuously performing pathfinding logic for more than 20 path finding objects.

Description of the parameters of the Inspector panel in DemoSearch1:

Scene PrefabIs: the pathfinding scene prefab to be loaded.
Block Data Json: Is the pathfinding data generated by the tool.
Cell Prefab: It is a prefabric body used to block the grid.
Move Count: Is the number of moving objects except the main character.
Move Speed: Is the global speed of movement.
Hero Prefab: It is the prefabric used by the protagonist.
Player Prefab: Is a prefab of other moving objects.
Hero Tail Prefab: When the main character moves, a trailing prefab is generated.
Player Tail Prefab: Is a trailing prefab when other moving objects move.
S Camera: Is the main camera, mainly used for the processing of click scenes.


Block data generation tool description:
Open the Demo/Tools scene
Mainly concerned about PlaneScene in Hierarchy.

LocationGO and Plane under PlaneScene
LocationGO is mainly used to mark the starting point of the lower left corner of the drawing blocking data.
Plane is a concrete scene.
Among the components of PlaneScene are two, BoxColider and ABlockTools.

The Size of the BoxColider must be the size of the scene that needs to draw the blocked data.
Some configuration properties of ABlockTools:
Scale Speed:When drawing blocking data, scroll the speed at which the axis in the mouse scales the scene.
Move Speed: Press the keyboard Ctrl+left mouse button to move the mouse when the scene is panning.
Map W and Map H: It is the width and height of the map, and it must be consistent with the Size of the BoxColider.
Map Org V2: It is used to determine the starting point of the lower left corner of the blocking data, referring to the coordinates of LocationGO.
Height Of Overlook: Is the height distance from the scene when the camera starts.
Cell W: It is the length of each block.
Cell Prefab: It is a prefabricated body that blocks the grid.
Frame Line Prefab: It is a prefabricated body of the border line.

After the Tools scene is running, you can block the drawing of data.
If the GameObject hooked by the ABlockTools component has generated blocking data in AJ_Pathfinding/Resources/AJ_BlockData, the data will be read and drawn on this basis.
Right click on the ABlockTools component in PlaneScene, pop up the tool box, select "Start drawing blockades" to start blocking rendering; if the blocked path has been drawn and saved, the existing blocking data will be loaded and rendered.

In drawing, press the left mouse button on the scene and move to generate blocking data; click the right mouse button to delete the blocking data; the mouse axis zooms the scene; Ctrl + left mouse button, move the mouse to pan the scene.
Once the drawing is complete, right click on the ABlockTools component in PlaneScene and select "Save the blockades data" to save. If you are not satisfied, you can choose "Clear the blockades data" to clear the current blocking data.


Description in DemoSearch2:
Open the Demo/DemoSearch2 scene and run it. Similar to DemoSearch1, the camera is added to this demo to better reflect the effects of the move.
In addition, two character models are sent, including standing and walking.


API description:
The main classes are: JOMapGrid2DData and AJFindRoad
JOMapGrid2DData is blocking data management class
Which provides conversion of grid coordinates and world coordinates
AJFindRoad is a pathfinding algorithm class
Which provides a pathfinding api

Eg.
//Create two principal objects
JOMapGrid2DData mapGridData = new JOMapGrid2DData();
AJFindRoad ajSearch = new AJFindRoad();
//Set basic information about the grid
mapGridData.SetMapData(float mapW,float mapH,float mapOffsetX,float mapOffsetY,int cellW);
//mapW and mapH are the width and height of the map.
//mapOffsetX and mapOffsetY are the coordinates of the lower left corner of the grid.
//cellW is the side length of each cell.
//Block by grid subscript settings
mapGridData.SetBlockIdx(int blockIdx, bool isBlock);
//Blocking by the xy coordinate of the grid
mapGridData.SetBlock(int cellx, int celly, bool isBlock)

//Call the pathfinding algorithm and return the path.
List<JOIntV2>
ajSearch.Search(int beginX, int beginY, int endX, int endY, JOMapGrid2DData mapData);

Among them beginX, beginY and endX, endY are the network coordinates of the start and end of the pathfinding respectively.
mapData is the above data including blocking information.
The function will return List<JOIntV2>. If it is null, it will not work. If it is found, it will return to the network path.

Can also refer to
Setting processing of JOMapGrid2D in Demo/Scrips/DemoSceneBase.
Calls to JOMapGrid2D and AJFindRoad in Demo/Scrips/MoveGO.


Future Content
1. Further optimize performance and increase the interface of the local update area
2. Increase support for frame synchronization
Welcome to contact us


Unity Asset Store URL:

    https://assetstore.unity.com/packages/slug/142391